How To Dig A Threadless - Part A
by Ray Klingensmith
Reprinted from "INSULATORS - Crown Jewels of the Wire", August 1983, page 10
Has it really been that long? Oh my, yes, it has been two years (!) since I've written an article for
C.J. So finally I've decided to get in gear and write a little from time to time
once again. Back when I was writing quite often, a lot of people asked if I'd
put together some info on "how to dig a threadless". Since that time
I've done an awful lot more digging, and with over one half ton of threadless
glass as reward (mostly broken), I feel a little more qualified to write it now!
So, on with a few tips for anyone willing to meet the challenge of findin' an
ole critter.
Most any area in the U.S. and Canada is within a day's drive to a
threadless era telegraph line. Anyone with a little patience and energy can find
a threadless, or at least a part of one, with even the smallest amount of energy
put into it.
Research
This is by far the number one most important factor
involved. You must know where the insulators were used, and when, and it may
also be a good idea to find out what type was used on a particular line. The
importance of doing your homework before your footwork cannot be stressed
enough. You will find the obstacles (rain, snow, cold, heat, annoying insects,
lack of personal physical condition, and plain old not finding something as soon
as expected) all too challenging to keep up the determination it takes to find
something, if you're not sure "it has to be here". What I'm saying is,
if you pursue a particular line, and you're not sure of the original location,
it becomes too easy to give up after some serious effort, because you start to
believe you're not looking in the right place. In finding threadless, you have
to consider the time factor involved from when they were used until now. A lot
of changes, both natural and man-made, have taken place over the years. So, on
with the research.
First off, pick out a line that has a special appeal to you -- one of local historical importance, or perhaps one further away from home
that has better potential, or even more desirable or rare insulators. (I live
fifteen miles from what is one "best insulated" threadless lines in
the country. I've spent less than ten hours of looking on it, and yet have
driven over 3500 miles one way to get to another line!)
Once you've centered
your attention on a line, find out as much as possible about it. Learn when it
was built, to determine what may have been used on it. Talk with local
collectors or diggers to find out what has been found in the area. Next, get
yourself some old history books that give some good general info. For some very
interesting reading I strongly suggest the following: The Telegraph in America
by James D. Reid; Wiring a Continent by Thompson; Old Wires and New Waves by
Harlow; History, Theory & Practice of the Electric Telegraph by Pope. The
first three can be found in some of the larger libraries. If they do not have
them, they will get them for you. In most cases all you will have to pay is a
dollar or two for postage. Both Reid's and Harlow's books have been reprinted
and are presently available for sale. I have several reprinted copies of Pope's
book. Let me know if you want to purchase one. Of the above four, I'd say Reid's
has the most factual info on the company histories. Thompson's book gets more
into a lot of the legal battles, etc., but has much on line locations and
construction. In some cases these books will describe and illustrate the
insulators used on various lines. These books will give you a good deal of
general info, and in some cases give you some detailed info on local material.
Once you've exhausted these books, look a little further into other sources.
Contact local libraries for area history books.
Another good source is
historical societies and museums. Sometimes they will be of little help, but
many times they can be of great help. You might want to check early newspapers
of the time the line was completed. In many cases the old local newspaper
offices have a copy of most or all of the papers they've ever printed. If you
can determine when the line was put into operation, there is a good chance there
was a feature article on it. Old local photos of the area are also of great
help. Once again, contact historical societies, libraries, universities,
colleges, archives or other government agencies. The photos will be of great
value in determining what side of the road or railroad the line was originally
on. In some cases they were relocated on the opposite side when rebuilt. So get
as early a photo as possible. When you look through an index at the above
mentioned agencies, look under "telegraph" first, but other listings
might be communications, or possibly the name of the company that built the line
(Western Union, U.S. Tel. Co., etc.). There might also be material listed under
the contractor who built the line, or the man in charge of construction of a
certain section. As an example, James Gamble or Western Union Tel. Co. could
both be listings when searching for info on the 1861 Transcontinental line. You
might also want to check with local court houses for line right of way, leases
or other legal material on a line.
And last but not least, talk with the old
timers in the area. Explain to them in detail all you know about the line. It
might help to show them a broken sample or photo of what you are looking for.
Listen carefully to what they tell you. In most cases they will be very
interested and help you all they can. But let's be logical. Most threadless
lines have been gone for one hundred years or more. These people will be very
sincere and believe they know the line you are talking about. In reality, many
times they are referring to a line that is, yes, very old, but not the same one
you are looking for. But there have been instances the old timers have sent me
straight to a location where threadless were used. One ninety year old gentleman
stands out in my mind. He was a wise old timer, full of energy, and had a
perfect memory. He pointed on my map, referred to the lake shown on it (That's
"Thank You Lake", Cecil.), and described how the old 1866 line ran
about eighty yards from its banks. He hadn't been there for seventy-two years,
and even though the line wasn't standing back when he was there, he still knew
it was there at one time. So off I went, hiking into the bush probably a mile
and a half from the new paved highway. After a good, long refreshing hike I
arrived at "his location". Well, he was wrong. This very remote place
didn't show any sign of the old line, not where he said. It wasn't eighty yards
from the lake, it was eighty-five yards! Yes, it was there!
Speaking of maps,
they will be one of your best friends in searching most lines. Try to get an
early map showing the route of the telegraph line. Pay particular attention to
the location of the line as compared to lakes, rivers or other land features.
These old maps are usually fairly accurate. By using a modern day map, you can
compare the two and pinpoint approximate location of the line, and see access
roads, obstacles, etc. There are very few early telegraph maps available, but
some do exist. Do your best to find one, and if you can't, at least pencil in on
a new map the town names you know the line went through. If you can find
detailed info on a location or two, it will at least be a start. As far as maps
are concerned, a good road map of an area will do the job in the more populated
areas of the country. However, if you plan a trip into a remote or wilderness
area, don't hesitate to invest in some good topographic maps. These will show
watercourses, roads, changes in elevation, etc. These are of great help in an
area where land features are the only clue as to where you are. In some cases
they could save your life. (As an example, I spent over eighty dollars on new
topo maps of a route of one line, and, believe me, after getting to the
location, I'd have gladly given twenty times the price paid for some of them.
There are times you need them -- badly!) Assuming you've now done your homework and
know what you are lookin' for, let's get to the next step.
|
Large Image (158 Kb)
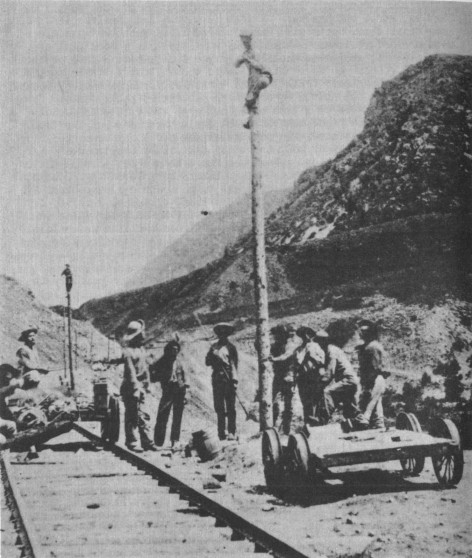
The telegraph
crew hard at work in 1869 building the UPRR line through Weber Canyon, Utah. The
man kneeling, at the extreme left of photo, is swinging a hammer, driving the
spikes through a side bracket and into the pole. The mounted bracket is complete
with insulator! Photos similar to these could be very useful in pin pointing
the exact location of poles in your insulator hunting today, if it was on a line
that hasn't been disturbed over the years. Un fortunately, this particular area
has seen many changes, including a four lane highway through the canyon.
Photo
courtesy of Utah State Historical society. |
Equipment
The type of equipment
needed for a hunt will largely depend on where you are going to look and how far
from home you will be looking. On the shorter trips, all you will need will be
the basic tools. I personally like to have along the four basics. First, my
"digger". (See figure A below.) I like to use this particular type of
tool because one can do good quick work and at the same time, with a little
common sense and care, not smash what you are looking for when you eventually
find it. These "rakes" come with teeth of various thicknesses and
lengths. Don't go out and buy one of the smaller lightweight ones. They just
don't hold up, and the teeth will bend or break after a short time of use. At
the same time don't get a super heavy duty unit, either, as it can wear you out.
The medium size, as shown, is heavy enough to handle the rocks and roots.
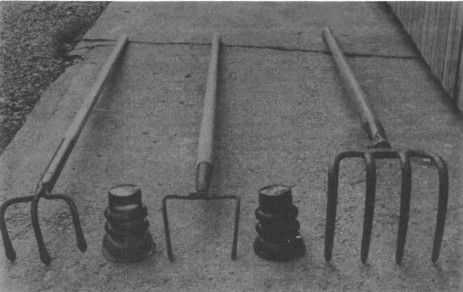
Figure A. The #1
tool of the trade. These rakes are available in various sizes. The one at left
will serve the purpose well in most places. The one at center is the type you do
not want to buy. It simply isn't heavy enough, and will, after a short period of
use, end up looking like this one, in want of its two front teeth. The one at
right, although it appears large, seems to do a good job after one gets
accustomed to working with it. |
Your
number two tool will be some type of shovel or spade. There will be times your
digger just won't do the job, and a shovel will be needed. This is especially
true in hard soil, heavily rooted, and rocky areas.
Number three tool is your
"dooger retriever" (Right, Skip?). You should have some type of small
tool (See figure B above.) with one long prong to work in the tight places. such
as under trees. These don't take up much room, and there are times you can't use
anything else.
Number four "tool of the trade" is a small saw, which
can be of great help in areas where trees or small underbrush get in your way.
It's amazing how much more enthusiastic you become if the area is cleared of
obstacles. A lot of roots that otherwise slow you to a crawl can be removed for
easy digging. Don't forget to pack a saw along.
Depending on where you are
looking, another very valuable tool is a metal detector. Most lines, whether
cross country, along a railroad or road, will have some form of metal relics to
be found from the old line. These will be mostly old line wire, tie wires, or
the old square spikes used to fasten the brackets to the pole. If you can locate
a line that made use of metal brackets (See figure C.) then you are really in
business. The only problem with this method of searching is the over abundance
of recent metal "junk" found in unbelievable quantity in the same area
where the line was located. But be patient. The tie wires and spikes are almost
always there. If you can stand the disappointment of digging a lot of false
alarms, the end result will be some old metal. Make sure you have an extra set
of batteries (or two) in case your old ones die on you. Also, the speakers in
these gadgets are very sensitive to moisture. One drop of rain in them and
fizzle -- no sound. If you are a thousand miles from the nearest detector dealer,
and your speaker goes fizzle, you can use ear phones which are available in most
locations. That's what one Iowa insulator hunter ended up doing after a little
rain shower put his machine out of service. After a day and a half of crawling
around under the pine trees on hands and knees, with his ear to the ground
listening for "Chester chatter", he decided it just wasn't producing
any glass! Thank God for Radio Shack. So, play it safe and cover your detector
with a plastic bag or something similar when it's wet outside.
Other equipment,
depending on where you are looking, includes compass, first aid kit, snake bite
kit, extra food and clothing, and a lighter. The compass is very important if
you are in a more remote area. For the "wilderness trips" I'd also
suggest packing in a lot more food and water than you think you will need. You
never know when an emergency will arise. Also, take enough extra clothing along
that you could survive a cold night without shelter should you become injured. A
small waterproof jacket is very sensible. All your extras will easily fit into a
small lightweight backpack. A backpack is better than something carried in the
hands, as it will be less tiring and will leave the hands free to maneuver.
Besides, if you find any insulators, you will need a place to put them to carry
them out. Don't forget a little wrapping material to protect your finds. Old
socks work real well, as does newspaper. Good old "T.P." comes in
handy for wrapping, as well as other things. (Ha, ha.) Don't forget it!
Another
tool you can use, with which I've had no experience, is a "poker".
(Contact the Plunketts for all the secrets of this method.) In the swampy areas
you can use a three or four tined fork. Make sure the tines are fairly close
together and rather long. (You might want to cut down a six or eight tine fork,
as the "teeth" are usually closer together than on one originally made
with fewer tines. Using this tool you can poke in the old bog until you
"feel" it hit glass. An old pro can tell in a instant the difference
between glass and a stone or rock. Glass is much smoother and has a different
feel and sound than stone. It takes some practice, but after awhile you can get
on to the method. Like I said, this method works best in swampy areas where it
can be very difficult digging.
Paint your digging tools a bright orange or
yellow. It will save an awful lot of time hunting for them after you lay them
down, and a few minutes later decide you've lost track of 'em.
|

)
)

)
)